You are here: Home > What We Do
What We Do

Office
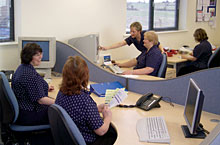 Impressions are received from various surgeries either through the post or our local delivery driver.
- They are sorted to note any special instructions or pre-booked jobs. The details are then entered on our computer system. These details include surgeons name, patients name, what the job is and any other relevant information. The job is then given a computer generated identification number and is passed on to the next department which is the Model Department.
Model Department
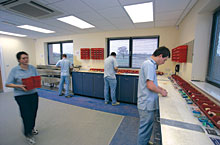 Once the impressions are received in the Model Department, they are sterilised, the instruction docket read and placed in containers.
- From the impression, a working model is then cast in a dental plaster. An opposing model and a duplicate model are also cast to ensure quality throughout the laboratory.
- When all models have been cast the docket is read once more and the prep or preps are sawn out accurately on a G2 saw. They are then trimmed, washed cleaned and labelled ready to move on to the next stage in the Gold Department.computer generated identification number and is passed on to the next department which is the Model Department.
Gold Department
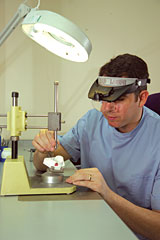 When the jobs are received from the Model Department the prescription is read and the preps are trimmed under magnification with a special burr. This is to remove any excess soft tissue from the margin. This enables us to clearly identify the margins of the crown.
- A thin layer of pink wax is used on the prep to block out any undercuts or discrepancies. A cement spacer is painted on the prep to ensure a good fit is achieved.
- Using an aquaforma, a thin layer of green wax is “pulled down” over the prep and the excess wax is trimmed away. Heated green wax is then sealed into the margin to ensure we achieve good margins.
- The bite is checked and cleared and a small collar is added. If the bite cannot be cleared then a wax backing will be added.
- When the wax coping has been made we add a sprue (this is a thin, round 1cm length of wax). It is then put on a special base with a ring and is invested with investment. When the investment has hardened, the ring is placed into a preset furnace and is heated to approximately 800°C.
- When the ring is at its optimum temperature, it is ready to cast in the prescribed metal using an induction-casting machine. Once cast, the copings are blasted with sand grain to remove any remaining investment.
- The metal copings are then cut off the base using a cut off disc. They are then fitted down on to the prep. Using a burr the outside is finished and the thickness of the metal is checked using callipers. The docket is then signed by a technician and is sent to the Ceramic Department ready for the application of porcelain.
- All finished metalwork is then seated accurately to the duplicate model to ensure a precise fit.
- Gold crowns, bridges and implants are waxed up to full contour using Bunsen burners and wax; every job is waxed up bespoke by hand. A similar procedure as above is applied when casting and finishing.
Ceramic Department
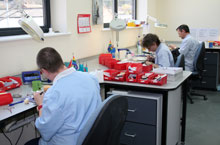 Once the metal work comes through from the Gold Department they are sand blasted or degassed depending on the metal to eliminate any impurities in the metal. They are not touched by hand after this procedure to reduce the risk of contamination. They are placed in tweezers for precise handling.
- One thin layer of metablend is then applied with a brush to cover the metalwork to aid bonding of the porcelain. They are then placed in a porcelain furnace for 10 minutes and fired to de-gas.
- The first layer of paste opaque is applied with a brush to the required shade. It is then applied as a thin layer to mask out the colour of the metalwork. The next procedure is to fire it in the porcelain furnace for a further 20 minutes.
- The second layer of paste opaque is applied in the same way as the first layer. This is to mask out any grey shadows of metal or a dark margin. It is then fired in the porcelain furnace for a further 20 minutes.
- Next the crown is built up with a layer of dentine (shade on the prescription ticket) this is the body of the shade, followed by a layer of enamel to give the incisal translucency. These are applied skilfully by hand with an artists brush. It is then fired in the porcelain furnace for 15 minutes to form a biscuit bake.
- Once biscuit fired, hand motors and diamond burrs are used to form the shape of the crown to match the rest of the mouth (morphology).
- Next we glaze the crown (shine). This is where any additional stain is added to give character to the crown to make it look natural. It is then placed back in the porcelain furnace for a further 10 minutes to create the glaze (shine).
- Once out of the furnace the crown is fitted onto the duplicate model to check for accurate contacts and fit. The colour is then checked against the Vita shade guide to make sure it matches correctly.
- Once this is all finished, it is taken back to the Gold Department for any exposing metal to be polished, cleaned and sterilised in an ultra-sonic.
- Finally it is taken to the office to be booked out, have its final inspection and packed ready to be delivered to the surgery.
Timeframes
These are our turnaround times for the production of restorations. Please allow extra time for complex cases.
| Crown & Bridgework |
4 working days
(Express service 2 working days, booking is essential) |
| Ceramic Restorations |
9 working days
(Express service 5 working days, booking is essential) |
| Implants |
7 working days
(Express service 5 working days, booking is essential) |
| Collections |
Collection by you own transport is available within a 30 mile radius of Fine Art Ceramics (Please telephone before 09:30 for same day collection) |
| Postal Service |
1st class pre-paid postal labels are available free of charge for your incoming work. |
| Express Service |
A surcharge of 15% will be levied for this service |
| Laboratory Instruction Sheets available on request |
Services
Metal Ceramic Restoration (inclusive of alloy)
Precious bonded crown
Precious bonded bridge unit
Non-precious bonded crown
Non-precious bonded bridge unit
Maryland bridge (including one retainer)
Maryland retainer per unit
Yellow gold alloy bonded crown (exclusive of alloy)
Rest seat
Circumferential metal margins
Porcelain butt margin
Posts and Cores (inclusive of alloy)
Post and core (NP)
Post and core only (NP)
Post and core (two part)
Post and core yellow (60%) (exclusive of alloy)
Post and core (plus diaphragm)
Post and core (ceramic coated)
Post and core (root cap)
Full Gold Restorations (exclusive of alloy)
Full gold crown 60%
Gold inlay/onlay/veneer 60%
PMA silver coloured crown
Yellow gold crown 40%
Yellow gold crown 2%
Non-Precious Silver & Gold Coloured Restorations (inclusive of alloy)
NP silver coloured crown
NPG yellow coloured crown
Ceramic Restorations Lava
Crown
Bridge unit
Ceramic Restorations Zirconia
Crown
Bridge unit
Ceramic Restorations Emax
Crown
Bridge unit
Press crown
Press inlay/ onlay
Ceramic Restorations
Dentine bonded crown
Porcelain veneer (platinum technique)
Porcelain onlay/inlay
Tissue coloured porcelain
Composite Restorations (Gradia GC)
Composite crown
Composite bonded to metal crown
Composite bridge unit - metal reinforced
Composite bridge unit - fibre reinforced
Composite Maryland - metal reinforced (inc. one wing)
Composite Maryland - fibre reinforced (inc. one wing)
Composite veneer
Composite inlay/onlay
Composite wing veneer
Implant Services (Straumann, Nobel Biocare, Astra, Bicon, Osteo Ti, plus more)
Implant Restorations metal based inc. of alloy up to 2g
Cement retained crown
Cement retained bridge unit
Screw retained crown
Screw retained bridge unit
Cresco bridge unit
Implant Restorations composite to metal (Gradia) inc. of alloy up to 2g
Cement retained crown
Cement retained bridge unit
Screw retained crown
Screw retained bridge unit
Implant Restorations metal free
Zirconia crown
Zirconia bridge unit
Emax crown
Emax bridge unit
Temporary acrylic crown
Temporary acrylic bridge unit
Sundries
Soft tissue model (1 unit)
Soft tissue per unit
Treatment planning/abutment selection
Transfer jig
Customise abutment (excluding alloy)
Milling of implant abutment
Implant surgical guide stent (1-6 teeth)
Implant surgical guide stent (full arch)
Radiograph stent
Special tray
Splints, Mouth guards & Fluoride Trays
Maryland splint (per tooth)
Gum Shield or night guard (clean soft material-medium)
Gum shield heavy
Gum shield coloured
Bleaching tray
Nightguard- Soft or Soft/Hard
Essix retainer
Soft splint